

How to Deep Clean a Mattress in 7 Simple Steps
Deep cleaning your mattress removes allergens, dust mites, sweat, and stains that build up over months of nightly use, and the process takes about two to three hours from start to finish using supplies you likely already own. Most mattresses harbor millions of dust mites and shed skin cells, triggering allergies and affecting sleep quality, but a thorough deep clean every six months restores freshness and extends the life of your mattress by years.
The good news? You don’t need expensive equipment or harsh chemicals. This guide walks you through the complete process, from stripping your bed and vacuuming to treating stains, deodorizing, and verifying your mattress is truly clean. We’ve consulted with certified cleaning professionals and sleep hygiene experts to bring you a method that works on all mattress types, from memory foam to innerspring to hybrid models.
Think of deep cleaning as hitting the reset button on your sleep environment. Regular sheet washing handles surface-level cleanliness, but deep cleaning tackles what’s embedded in the mattress itself. The buildup happens gradually, so you might not notice the yellowing, odors, or allergen load until you commit to a proper clean.
The investment of a few hours twice a year pays off in better sleep, reduced allergy symptoms, and a mattress that looks and smells like new. Whether you’re dealing with visible stains, mysterious odors, or simply want to maintain a healthier bedroom, this step-by-step approach gives you everything you need to tackle the job with confidence. Let’s gather your materials and get started.
What You’ll Need to Deep Clean Your Mattress
Before you begin, gather everything you’ll need to avoid interruptions mid-process. Having the right supplies on hand makes the job faster, easier, and more effective.
- Vacuum cleaner with upholstery attachment and crevice tool
- Baking soda (at least one full box, two for queen or king sizes)
- Clean white cloths or microfiber towels (several)
- Spray bottle for mixing cleaning solutions
- Cold water for diluting cleaners and rinsing
- Mild dish soap or enzyme cleaner for general stains
- Mattress protector for after cleaning
Your vacuum’s upholstery attachment is crucial because it prevents the beater bar from damaging mattress fabric while still providing strong suction. The crevice tool reaches seams where dust mites and debris accumulate. Baking soda acts as both a deodorizer and moisture absorber, neutralizing odors naturally without harsh chemicals.
White cloths prevent color transfer onto your mattress, and microfiber works best because it absorbs moisture efficiently without leaving lint behind. An enzyme cleaner breaks down organic stains at the molecular level, making it more effective than soap alone for bodily fluids.
For tougher jobs, consider adding hydrogen peroxide (3% solution) for blood stains, white vinegar for general disinfecting, or a handheld steam cleaner for deep sanitization. A stiff-bristled brush helps work cleaning solutions into stubborn spots without damaging fabric.
Budget-conscious? Skip the enzyme cleaner and use a mixture of dish soap, hydrogen peroxide, and baking soda instead. It costs pennies and works remarkably well. A regular vacuum works fine if you don’t own specialized attachments; just use the hose directly and work slowly over the surface.
Safety Precautions Before You Begin
Before you start scrubbing, take a moment to set yourself up for success and avoid damaging your mattress or exposing yourself to unnecessary risks.
First, open windows in the bedroom and turn on a fan if you have one. Good airflow helps cleaning solutions evaporate faster and protects you from inhaling concentrated fumes from hydrogen peroxide, vinegar, or enzyme cleaners. If you suffer from allergies or asthma, consider wearing a dust mask during the initial vacuuming, the process will stir up settled dust mites, dead skin cells, and other allergens that have accumulated over months or years.
Test any cleaning solution on a hidden spot first, like the corner near the mattress seam or the underside edge. Wait 10 minutes to check for discoloration, fabric damage, or unexpected reactions. This step matters especially for memory foam and latex mattresses, which can break down when exposed to harsh chemicals or too much water. Memory foam should never be soaked, use minimal moisture and blot rather than scrub. Innerspring mattresses tolerate more liquid, but you still want to avoid saturating the padding layers.
Skip steam cleaning entirely if your mattress has a “do not wet” tag or if the manufacturer’s care instructions warn against moisture. When in doubt, stick with dry methods like vacuuming and baking soda deodorizing.
The Complete Deep Cleaning Process
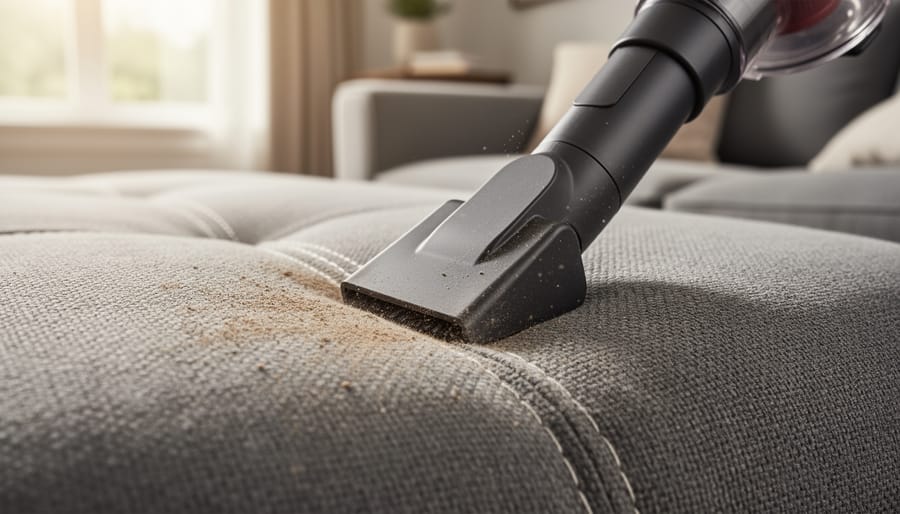
Step 1: Strip and Vacuum the Mattress
Start by pulling off all sheets, pillowcases, mattress protectors, and any other bedding. Wash these separately while you work on the mattress itself. Once the mattress is bare, grab your vacuum with the upholstery attachment, this wider, fabric-friendly tool prevents scratching while maximizing suction.
Run the attachment across the entire surface in slow, overlapping passes. Don’t rush; speed reduces pickup. Pay extra attention to seams, piping, and tufted areas where dead skin cells, dust mites, and debris accumulate. Switch to the crevice tool for tight corners and the edges where the mattress meets the sides.
This initial vacuum pass removes the bulk of surface contaminants. Daily vacuuming reduces dust mites significantly, so this step directly improves allergen levels. Go over each side thoroughly, you’ll vacuum again later, but removing this first layer makes the cleaning solutions more effective and prevents you from working dirt deeper into the fabric.
Step 2: Treat Stains and Spots
After vacuuming, address any visible stains before moving forward. Different stains respond to different treatments, so identifying what you’re dealing with saves time and effort.
For sweat stains and general yellowing, mix equal parts hydrogen peroxide, dish soap, and water in a spray bottle. Lightly mist the affected area, don’t soak it, and let it sit for 10 minutes before blotting with a clean cloth. Work from the outside of the stain inward to prevent spreading.
Blood stains require cold water only. Hot water sets blood permanently. Dab the stain with a cloth dampened in cold water mixed with a tablespoon of salt. Blot repeatedly until the stain lifts.
Urine stains need an enzyme cleaner or a vinegar solution (equal parts white vinegar and water). Spray the area, wait 15 minutes, then blot dry. The acid in vinegar neutralizes the alkaline salts in urine that cause odors.
Always blot, never scrub. Scrubbing pushes stains deeper into the mattress layers and damages fabric. Use white cloths so you can see when the stain transfers. Let treated areas air dry completely before the next step.
Step 3: Deodorize with Baking Soda
Grab your box of baking soda and sprinkle a generous, even layer across the entire mattress surface, about a cup for a twin, up to two cups for a king. Don’t be shy; you want full coverage. Baking soda reduces odors by neutralizing acids and absorbing lingering moisture trapped in the mattress fabric. Gently rub it into the surface with a clean brush or your hand in circular motions, working it into seams and textured areas where odors hide. Let it sit for at least eight hours, overnight is ideal if you can swing it. This dwell time lets the baking soda pull out mustiness and body oils. If your schedule’s tight, three hours works in a pinch, but longer yields better results.
Step 4: Deep Vacuum Again
After the baking soda has sat for at least 30 minutes (ideally several hours), it’s time to vacuum again, this time more thoroughly than your initial pass. Use slow, overlapping strokes across the entire mattress surface, paying extra attention to seams, tufts, and any quilted patterns where baking soda tends to settle. Work in a grid pattern to ensure you don’t miss any spots. Run your hand lightly across the surface between passes; if you feel gritty residue, vacuum that area again. The mattress should feel completely smooth with no powder remaining. Any leftover baking soda will feel uncomfortable and may clump with moisture, so don’t rush this step.
Step 5: Steam Clean (Optional but Recommended)
Steam cleaning delivers exceptional sanitization by using high heat to kill dust mites, bacteria, and allergens that vacuuming alone can’t eliminate. If you have a steam cleaner or upholstery cleaner, now’s the time to use it.
Hold the steam nozzle 6-8 inches above the mattress surface and move slowly in overlapping passes. Don’t saturate any one area, memory foam and latex mattresses are particularly sensitive to excess moisture. For innerspring mattresses, you can work slightly closer but still avoid drenching the fabric.
The steam should feel warm and slightly damp to the touch, never soaking wet. Work in sections, allowing each area to release steam vapor before moving on.
If you don’t own a steamer, skip this step rather than renting equipment for a single use. The previous steps provide thorough cleaning on their own, though steam does offer that extra sanitizing boost for households with allergies or pets.
Step 6: Allow Complete Drying
Drying is where many people rush and risk undoing all their hard work. Your mattress needs at least 6-8 hours to dry completely, though thicker mattresses or humid conditions might require 12 hours. Dry quickly to prevent mold and musty odors from developing.
Position the mattress in a well-ventilated room with windows open. Run ceiling fans or point box fans directly at the surface to accelerate evaporation. If weather permits, sunlight streaming through a window adds natural drying power and helps kill remaining bacteria.
Check for dryness by pressing your palm firmly against different areas. The surface should feel completely dry and slightly cool, not damp or clammy. Run your hand along seams and the perimeter where moisture lingers longest. If you detect any dampness whatsoever, give it another few hours. Putting bedding on a damp mattress traps moisture and creates the perfect environment for mold growth.
Step 7: Flip or Rotate and Protect
With your mattress now fully dry, it’s time for the final step that helps maintain your hard work.
Check your mattress type first. Traditional innerspring and some hybrid mattresses benefit from flipping completely, switching the top and bottom surfaces. Memory foam and pillow-top mattresses typically can’t be flipped but should be rotated 180 degrees so the head end becomes the foot end. This rotation helps distribute wear evenly and extends your mattress’s lifespan.
Before replacing your bedding, invest in a quality waterproof mattress protector. This creates a barrier against future spills, sweat, and dust mites without changing how your mattress feels. Choose one that’s breathable and machine-washable for easy maintenance.
Slip the protector over your freshly cleaned mattress, smoothing out any wrinkles. Then add your clean sheets and bedding. You’ve just given your mattress professional-level care, and that protector will help keep it fresh far longer.
How to Know Your Mattress Is Properly Cleaned
A properly cleaned mattress should pass several quick checks before you put fresh sheets back on. Start with a visual inspection: the surface should look uniform without visible stains, discoloration, or residue from cleaning products. Run your hand across the entire surface to feel for any damp spots or sticky patches that might indicate leftover cleaning solution.
The smell test is your next indicator. Get close to the mattress and take a few deep breaths. You should notice a neutral or slightly fresh scent, not musty odors, chemical smells, or the original odor you were trying to eliminate. If you still detect unpleasant smells, you might need to repeat the baking soda treatment and let it sit longer this time.
Check for complete dryness by pressing firmly on different areas of the mattress, especially where you applied the most moisture during cleaning. The surface and the layers beneath should feel dry and springy, not cool or damp. Pay extra attention to the sides and corners where moisture tends to linger. If you’re unsure, give it another few hours in a well-ventilated space with a fan running.
If stubborn stains remain after your first attempt, don’t worry. Repeat Step 2 with a more concentrated solution on those specific spots, then follow with the baking soda treatment again. For persistent odors, consider leaving baking soda on the mattress for 12-24 hours instead of the standard few hours. Some deep-set issues, particularly older stains or heavy odors, may require two rounds of the full cleaning process spaced a week apart.
Maintaining Your Freshly Cleaned Mattress
Now that you’ve invested time in deep cleaning your mattress, a few simple habits will keep it fresh far longer. Regular maintenance takes minutes but saves you from scheduling frequent deep cleans.
Vacuum your mattress monthly using the upholstery attachment, paying attention to seams and tufted areas where dust mites and dead skin cells accumulate. This quick pass prevents buildup that turns into stubborn grime. If you notice any spots or spills, blot them immediately with a clean cloth and a small amount of mild detergent mixed with water, working from the outside in to prevent spreading. Never let liquids soak through to the mattress core.
Keep these quick maintenance habits in your routine:
- Strip bedding weekly and air out the mattress for 15-30 minutes to reduce moisture
- Rotate your mattress every three months to promote even wear
- Use a quality mattress protector and wash it monthly in hot water
- Run a dehumidifier in humid climates to prevent mold and mildew
- Sprinkle a light layer of baking soda quarterly and vacuum after 15 minutes
A good mattress protector acts as your first line of defense, catching sweat, oils and accidental spills before they reach the mattress itself. Choose a waterproof, breathable version that won’t trap heat or crinkle noisily.
How often you deep clean depends on your household. If you have pets that sleep on the bed, young children, allergies or night sweats, aim for every four to six months. Most households without these factors can extend to twice yearly. Keep your bedroom environment fresh, organized bedroom by controlling dust and maintaining good airflow, which naturally supports mattress hygiene between deep cleaning sessions.
Common Questions About Deep Cleaning Mattresses
Deep cleaning your mattress raises several practical questions, especially if it’s your first time tackling this task. Here are answers to the most common concerns that come up during the process.
How long does it take to deep clean a mattress?
The active cleaning time is about 30-45 minutes, but you’ll need to allow 6-8 hours for complete drying before remaking the bed. Plan to start in the morning so your mattress is ready by bedtime.
Can I sleep on my mattress if it’s still slightly damp?
No, sleeping on a damp mattress can lead to mold growth and trap moisture inside the materials. Always wait until it’s completely dry to the touch, even if it means sleeping elsewhere for one night.
How often should I deep clean my mattress?
Deep clean your mattress every 6 months under normal conditions. If you have pets, allergies, or young children, quarterly deep cleaning is better, while those with minimal use can extend it to once a year.
Is steam cleaning safe for memory foam mattresses?
Use steam very sparingly on memory foam, keeping the steamer moving and never saturating the material. Excessive moisture can damage the foam structure, so stick primarily to baking soda and spot treatments for these mattresses.
What if the smell doesn’t go away after cleaning?
Persistent odors usually mean moisture is trapped inside the mattress. Place it in direct sunlight for several hours, run fans continuously, and consider a second baking soda application for 24 hours before vacuuming again.
Can I use a carpet cleaner on my mattress?
Yes, but use the upholstery attachment with minimal water and cleaning solution. Make several dry-suction-only passes afterward to extract as much moisture as possible, and allow extra drying time.
If you’re working with a pillow-top mattress, concentrate your cleaning efforts on the top layer where most soil accumulates, but don’t oversaturate it since the padding can hold water longer than standard mattress materials. For older mattresses with stubborn discoloration that won’t lift, understand that some yellowing from age is permanent and doesn’t necessarily indicate the mattress is unclean after you’ve followed all the steps.
You’ve just invested time in something that truly matters: the quality of your sleep and your health. A deeply cleaned mattress doesn’t just look better, it creates a healthier sleep environment by removing allergens, dust mites, and bacteria that accumulate over time. You’ll notice the difference when you slip into bed tonight on a fresh, odor-free surface.
The first deep clean always takes the longest because you’re learning the process. Next time, you’ll move through the steps more confidently and efficiently. Mark your calendar to deep clean every six months, or more frequently if you have allergies, pets, or young children. Between deep cleans, those quick monthly vacuuming sessions will keep things manageable.
Think of mattress care as part of your overall wellness routine. We spend roughly a third of our lives in bed, and that environment deserves attention. The hour or two you dedicate to this task pays dividends in better sleep, fewer allergy symptoms, and simply knowing you’re resting on a genuinely clean surface. Your future self will thank you for making this a regular habit.